Confused
1 Follower
Recent Profile Visitors


Bookmarks
-
Cable Shielding
DIY DC power cablesOK here it is: cable shielding, how to make it work and how almost all cables have it wrong.
The first important question is, what is electrical shielding and how does it really work?
Lets look at the infamous "Faraday cage". For this discussion it is a metal box, with all sides well electrically connected (no gaps). Shielding means that electrical fields outside cannot be sensed inside. Conversely electrical fields inside cannot be sensed outside.
So how does this work? When an electric field from the outside world impinges on the box it causes the electrons in the metal to move, this rearrangement of the electrons creates an electric field inside the metal which exactly counteracts the external field, thus the field is essentially stopped at the periphery of the box.
The important aspect here is the part "electrons in the metal move". What are moving electrons called? Current. In order for current to flow there has to be a loop. Current will not flow unless there is a loop. In the case of the Faraday cage, the loop is the whole cage. Lets say an electric field impinges on a side of the box, this causes a current flow that goes all the way around the box back to where the field impinges on the box. If the sides are not electrically connected to each other the current cannot flow, thus the electrons cannot move, and the canceling electric field does not get setup, thus no shielding.
It turns out that for AC electric fields it is a little different. Some current can flow due to capacitances between conductors. The electrons can move a little bit one way, then a little bit back. If the frequency is high enough the back and forth movement, which is charging and discharging the capacitance is sufficient for shielding. For a given capacitance the lower the frequency the less effective the shielding. The electrons start moving which charges the capacitance, then stop moving when fully charged, they don't do the full movement necessary to produce the canceling field.
So what about shielded cables? I hope is now obvious that for shielding to be effective there needs to be a conductive path from one end of the shield to the other. If there is not such a path the only shielding that is going to happen is for high frequencies due to cpacitances involved with the shield.
The best way for the shielding to work properly is a separate wire connected to each end of the shield. This is sufficient for shielding from DC to very high frequencies. Note the shield does NOT have to be connected an earth ground, the "ground" of the circuit at either end, or any thing else for that matter. A cable with a shield the is not connected to anything else except itself (ie a separate wire from one end to the other of the shield) will be highly effective in shielding what is inside.
Where does this wire need to go? It can be either inside or outside the shield, but if it is inside it can couple to the signal wires inside, so it is usually best to have it outside the shield. Note it has to be insulated from the shield except for the ends where it connects to the shield. It should intersect as little of the external field as possible so it should NOT be tightly spiraled around the cable. Just running along side the shield is best, although a very loose spiral (say one turn per foot) is almost as good.
So some ramifications of this: The traditional "connect the shield to one end and let the other end float" is not good, it does not allow a loop so shielding does not happen very well. If you add the external wire connected to the shield at both ends, then you CAN connect one or both sides of the shield to the signal ground or some other ground, but you don't NEED to for effective shielding. You will find that in many cases leaving the shield completely disconnected from the rest of the circuit is the best way to go, you get the benefit of properly working shielding without any interaction of the shield with your system. You may wind wind up with static charges on the shielding so a resistance from the shield to ground may be useful in some cases in order to dissipate static charges.
So how come nobody does this? I don't know. My only guess is that cable shielding has been going on long before the actual mechanism for shielding was worked out, thus by the time it was understood, cable shielding was "standard" and nobody ever even thought about analyzing it based on an understanding of how shielding actually works.
But shouldn't the big companies know about this? It seems they don't. I have read several app notes from Belden that state that shielding is only effective at high frequencies, at audio frequencies and power supply frequencies (60Hz etc) it is totally ineffective.
Audio people are the only ones that seems to at least empirically know about this. Remember phono cartridges and preamps, there is a little green wire that goes from the "ground jack" on the preamp to the tonearm. Everybody assumes that this is to "ground the cartridge" but what it really does is provide a loop from one end of the interconnect shield to the other, it has nothing to do with whether it is "grounded" or not. So if you have (or had) a turntable you were actually taking advantage of this without realizing it.
So there you have it, shielding DOES work, but only if you provide a path from one end of the shield to the other. This is effective even if you don't connect the shield to anything else.
John S.
-
SOtM Clock cable mod
Reference & Word Clock Cables1 hour ago, mozes said:Can you pls provide a link to where you got this cable from?
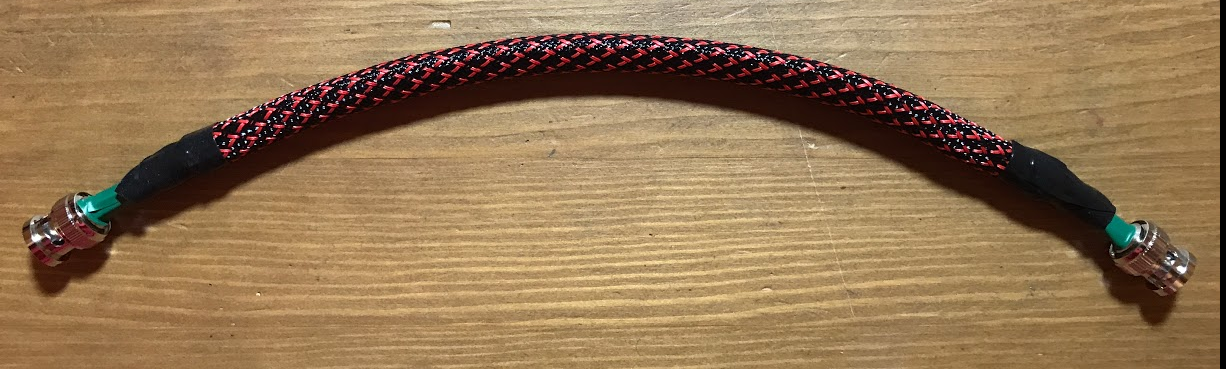
I got this cable from Pasternack, they didn't have this cable originally, and I had them customer made this cable using RG178 single shielded cable and put the link on their website here: https://www.pasternack.com/bnc-female-umcx-2.5-plug-rg178bu-cable-assembly-pe3c5301-p.aspx
You will need to enter the length you want to get the price quote on the web page. One thing to be mindful is the BNC connector on this cable is physically larger than the stock BNC connector, and will require enlarge the stock connector hole.
1 hour ago, Confused said:No, not yet. Plus, I still need to get over the thought of possibly voiding the warranty on what is very new kit.
Out of interest, was this a reasonably easy mod to perform? I imagine that it is quite straightforward, but was wondering if you had any issues when doing this for real?
The mod is fairly easy to perform. There are 3 things to pay attention if you plan on doing the mod yourself
- The BNC connector from the cable I purchase is physically larger then the stock BNC connector, which you will need to enlarge the stock hole.
- Release stock cable from hot glue in multiple locations. This is simple to do especially with the help of IPA, X-acto knife, and a little patience.
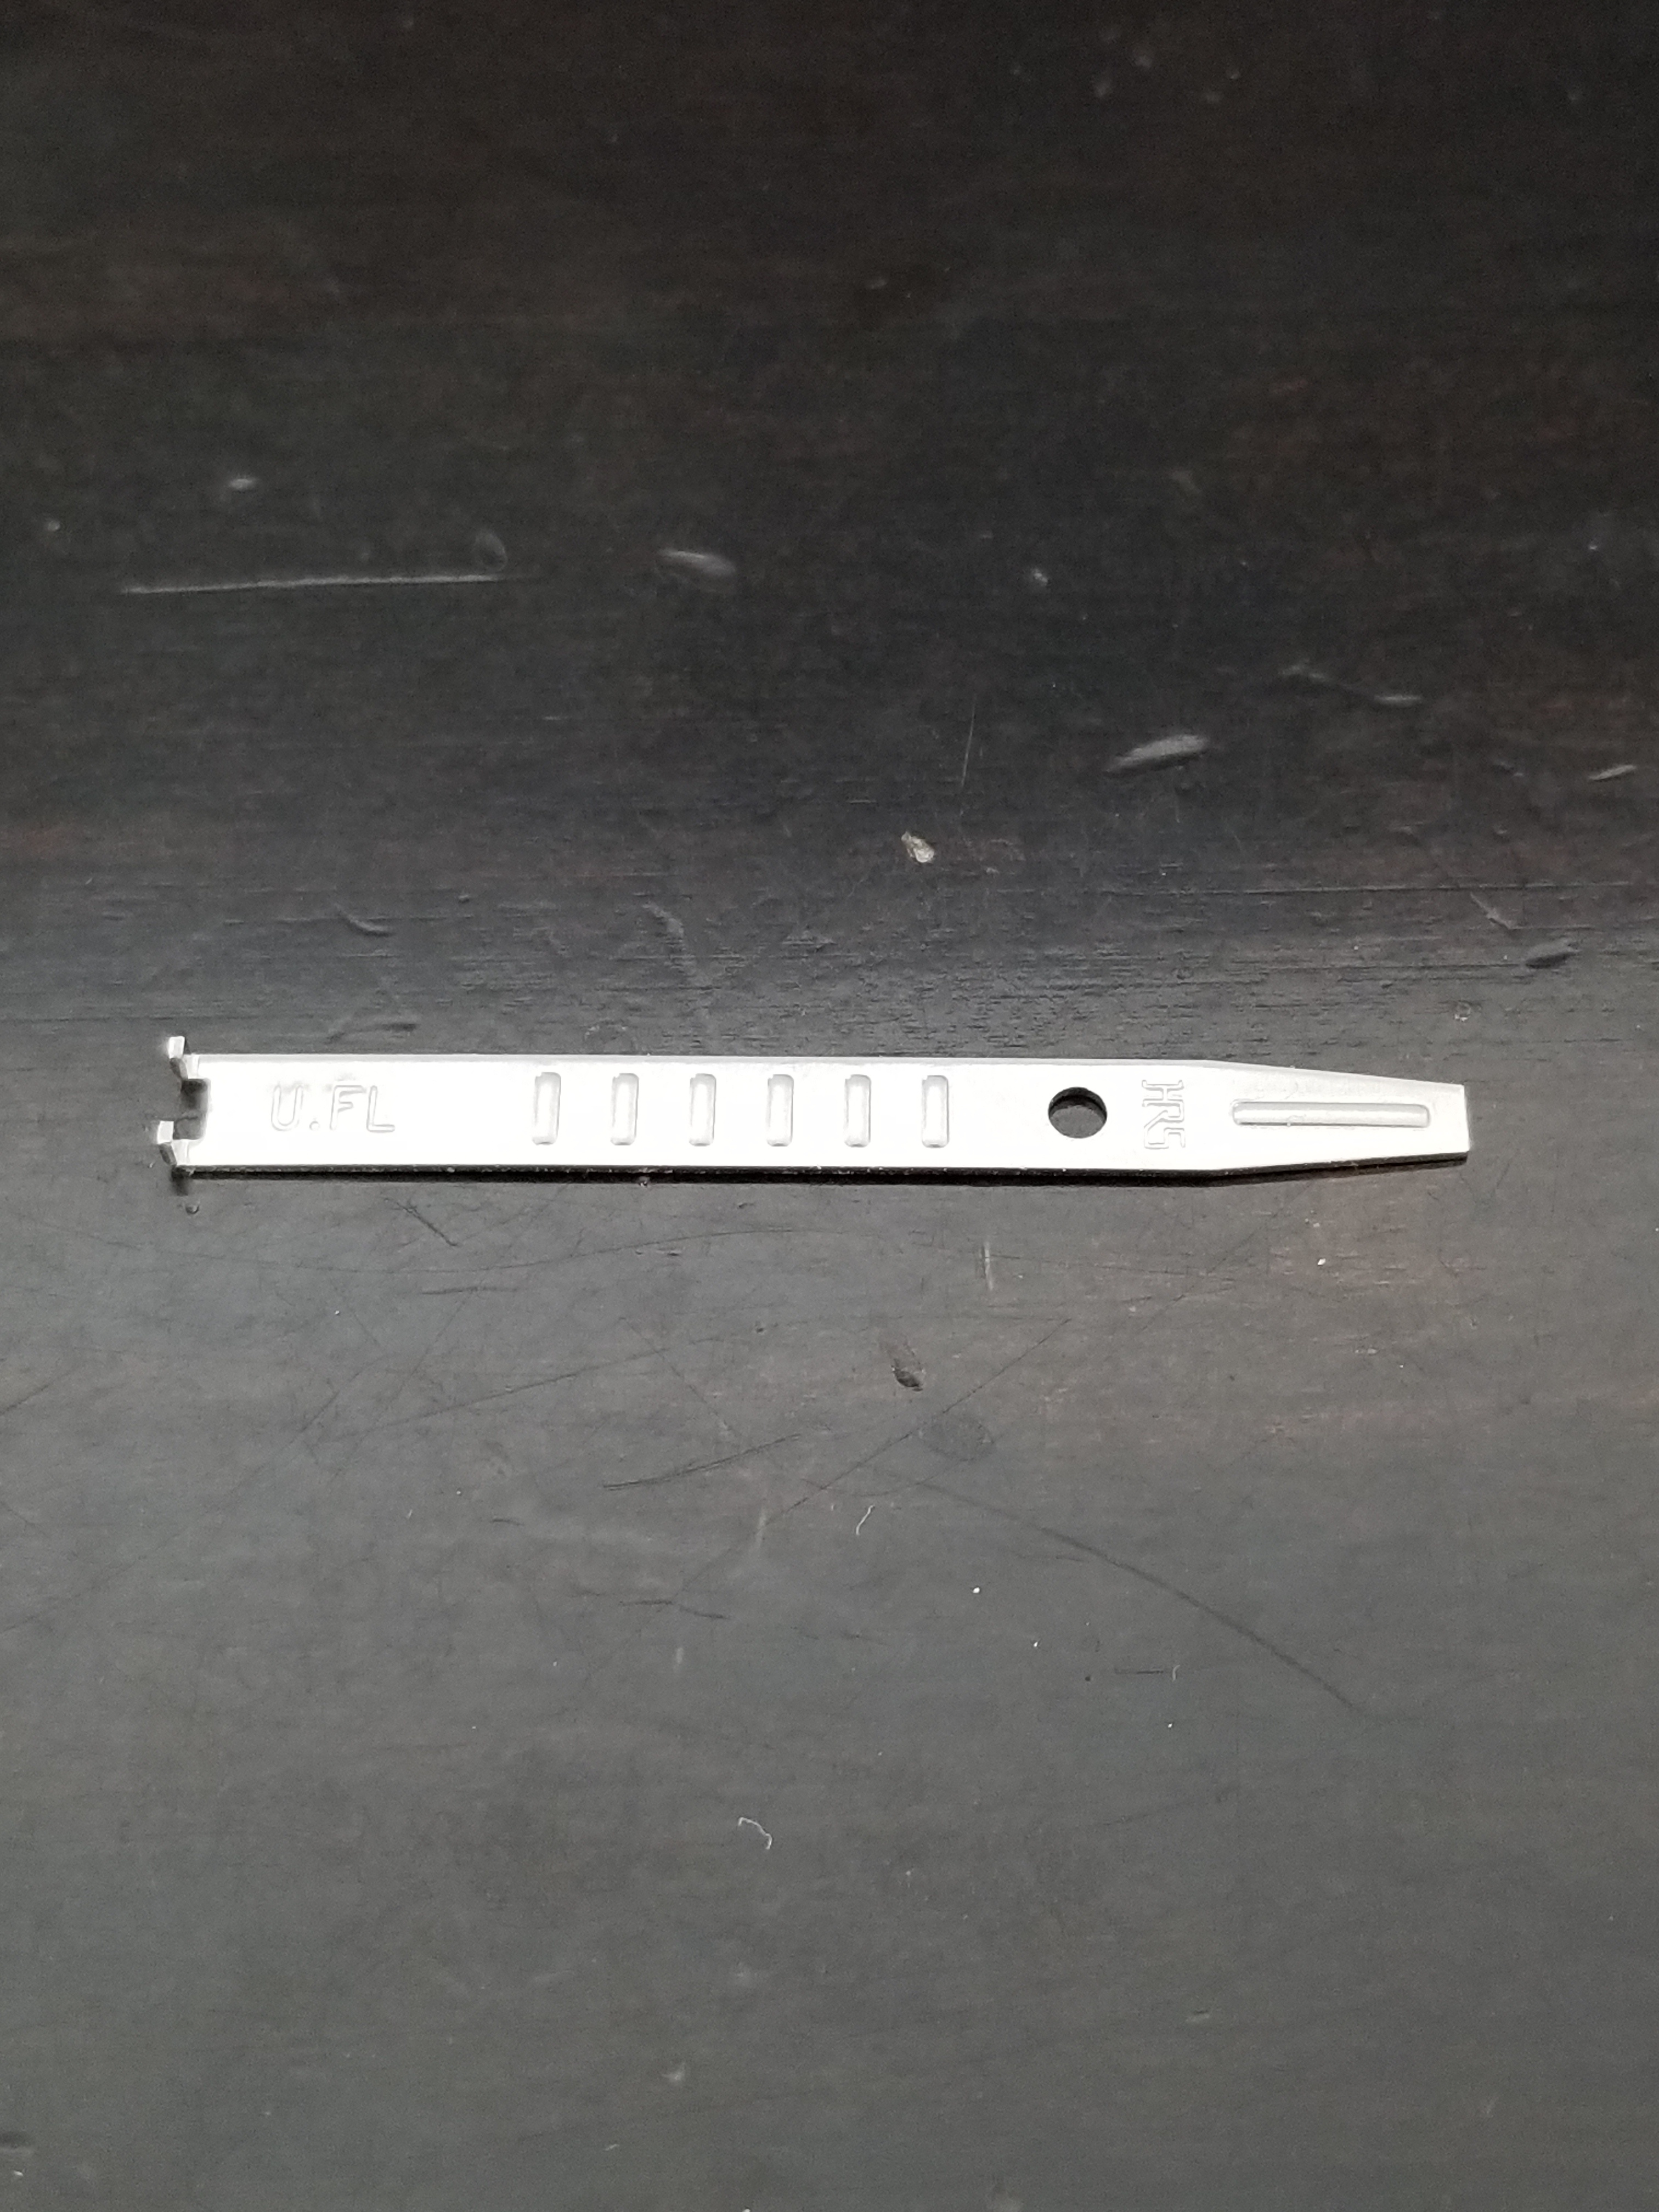
- Removing stock u.FL plug cable connector from the board. Although there are many different tools and methods to get this done, but my preference is using the u.FL removal tool (see picture below) instead.
I will be replacing other u.FL to SMB and u.FL to u.FL cables in my txUSBUltra later today, and I will post pictures once I am done. So far, I am quite pleased with the result just by replacing this u.FL to BNC cable.

-
PlayClassics TRT v3.0 sneak preview
PlayClassics TRT v3.0 sneak previewHello everyone! I finally have something new that I would like to share with you.
We have spent the last 18 months working on a new version of our Truthful Recording Technology. We are about to launch it to the public but before we do, I would love to share it with you here at the Computer Audiophile.
This new version features a new piano with a new placement on the stage, some minor adjustments on the acoustics of the hall and a completely new calibration. The recording gear and the placement of the mics remains the same. Our philosophy has not changed a bit. We are just digging deeper into our original project.
Edit (April 14 ):
The previous calibration (v2.0) had some issues that we wanted to solve. I do think v3.0 was successful on fixing those issues but I also felt that the "general balance" was somehow altered on this new v3.0. I have been working on it and as a result we now have a new calibration v3.1. I have prepared a zip file with seven samples processed with this new v3.1
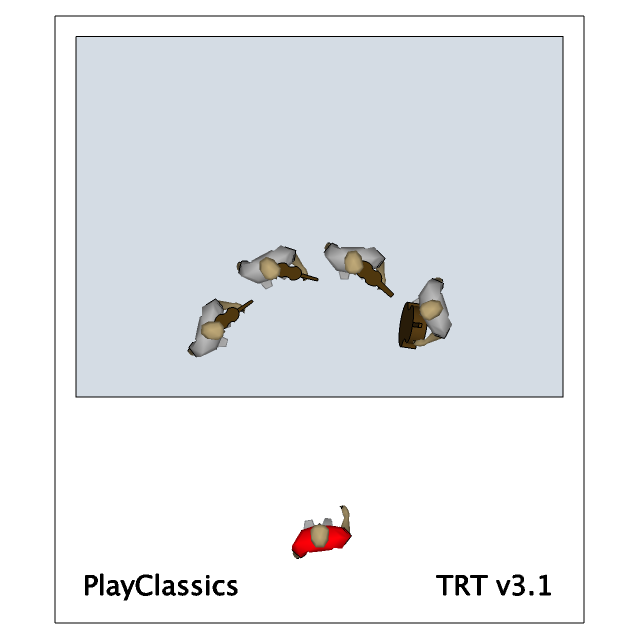
- one movement of a String Quartet
- one movement of a Wind Quintet
- the Flamenco sample number one
- the Drums sample number three
- one short piano piece by Mas Porcel
- one short piano piece by Webern
- Liebeslied by Rachmaninoff
If anybody wants to try these please post or send me a PM and I will send you the codes to download them.
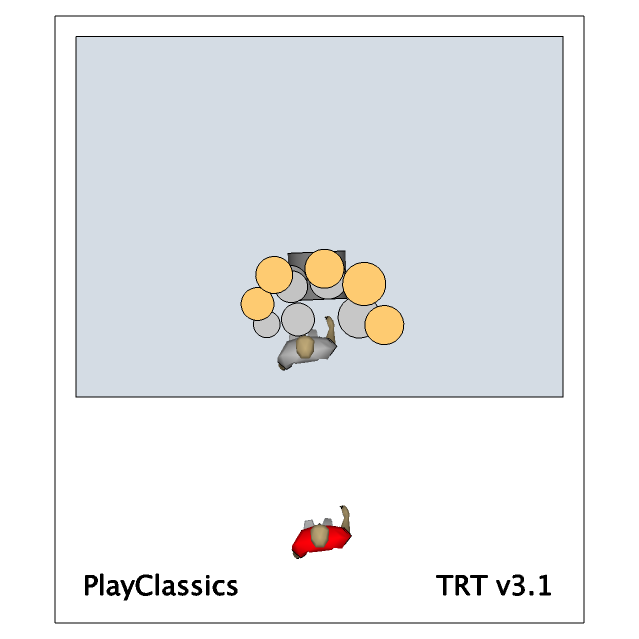
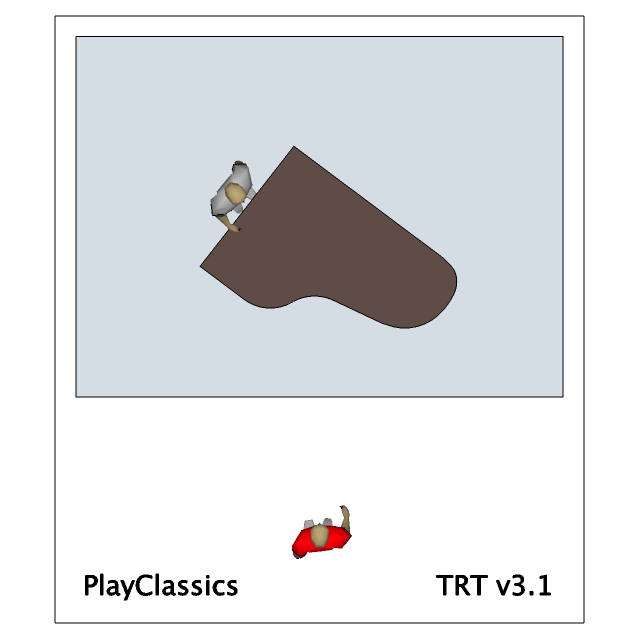
Here is a sketch of the string quartet:
here is a sketch of the wind quintet:
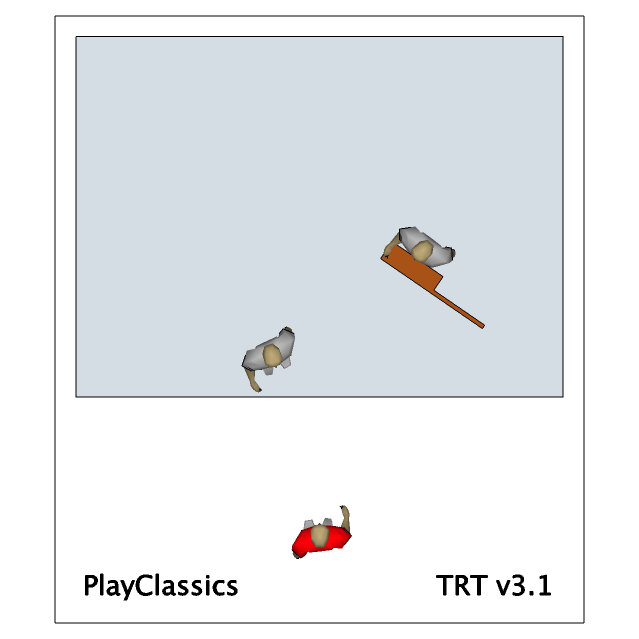
here is a sketch of the flamenco sample:
here is a sketch of the drums sample:
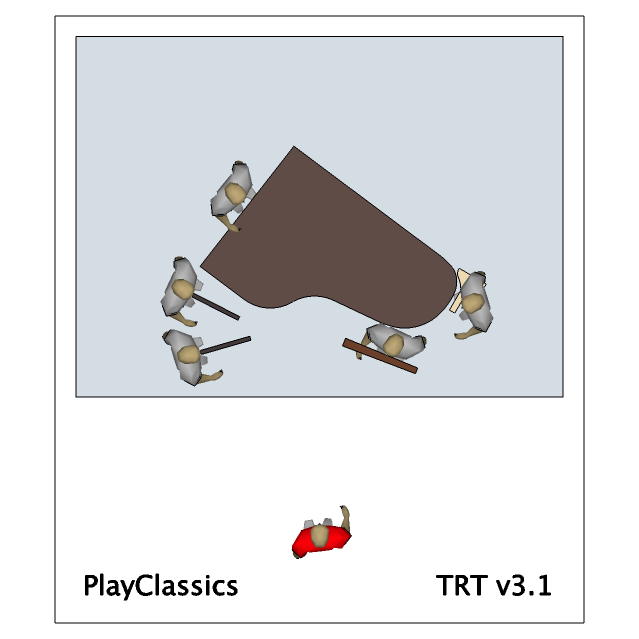
here is a sketch of the piano:
the person in the red shirt represents the placement of the mics.
I hope you find this interesting. I would really appreciate your feedback
-
360
A novel way to massively improve the SQ of computer audio streamingOK gang - SUCCESS building my very first JSSG 360 cable!
To those DIY-phobic readers like me who've been hesitant to try this - come on in, the water's fine.
Steps:
-
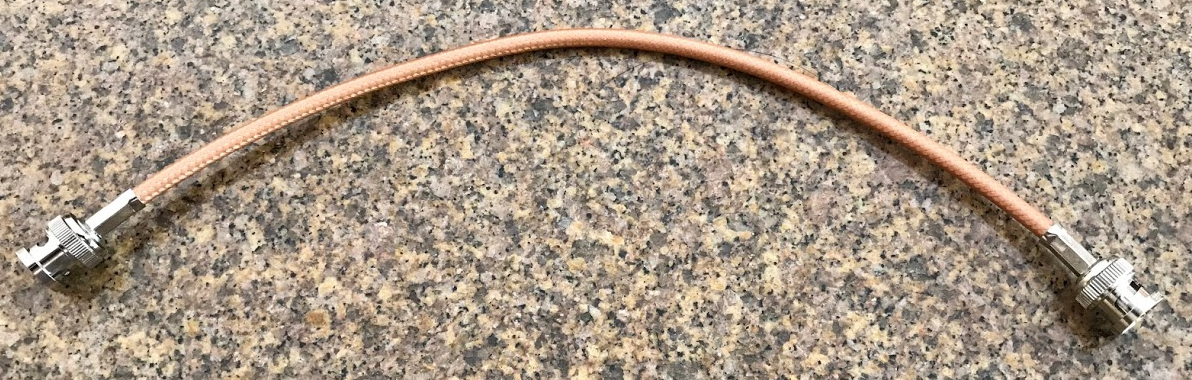
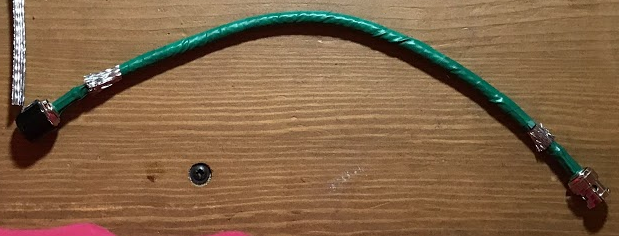
I started with this generic Pasternack RG-400 50Ω cable
- I first masked the protruding ends of the BNC connector into the cable with electric tape (green in the picture).
- I then used a pencil to shape the flat Electriduct 3/8" flat tinned copper braid into a cylindrical form, and then slid the braid over the BNC connector onto the cable.
-
Following which, I applied electric tape over the bulk of the braid, leaving only the ends exposed, as shown below. Note: I used some tension while applying the tape to mimic the effect of the heat shrink tubing. It seemed to work fine. Also, this particular brand tape as shown is quite flexible and did not cause the cable to become resistant to bending as I had feared.
-
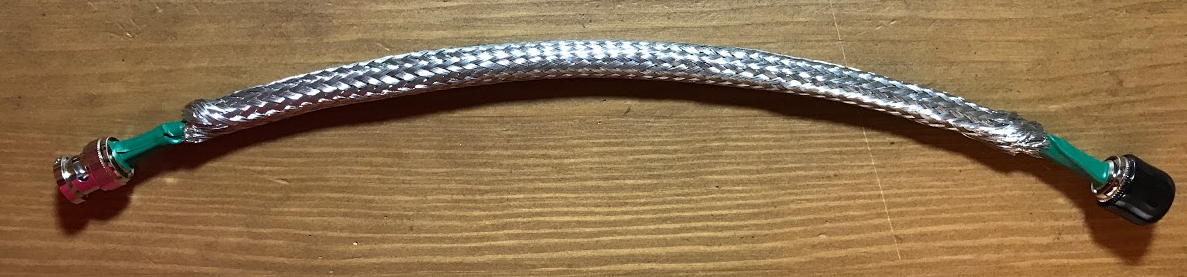
Next, slide on the 2nd layer of braid:
- After this, I "encouraged" the exposed ends of the inner and outer braids to fuse together - not hard, just peel away from the cable and then finger twist the wires of both braids together. I then used the silicone rubber fusing tape - awesome stuff, excellent hint by @mozes - to seal the fused ends of the braid. This tape is stretchy, so it helps to apply some tension when applying it, and it just fuses nicely.
- Final step, slide on the wire sleeve for a nice finished look, and seal with the fusing tape.
End result:
I'll be doing some listening this evening, and will report on how it sounds. Exciting stuff!
-
I started with this generic Pasternack RG-400 50Ω cable
-
Hires music finder
Lies about vinyl vs digital17 minutes ago, GUTB said:Wow good find.
I also like Tony Overwater's albums on Turtle Records such as OP and Up Close.
BTW, this site is a great way to find out what's available in HR:
You might also like some of the albums available from Sound Liaison:
-
Neo
Let's talk about SOTM SMS-200 ULTRAI have spent a happy morning listening to the new Neo version of the sMS-200Ultra. First to be clear on exactly how I have everything set up at the moment. Two things have changed since the SOtM kit was sent back to Koreo, the sMS-200Ultra has had the Neo upgrade and both the sMS-200Ultra and tX-USBultra have had the original "overlength" internal clock cables replaced with 20cm items. One thing I do not like doing is changing two things at the same time, if you then notice anything positive or negative it is not possible to be sure what to attribute it to. So for the purpose of this moring's listening, I have left the REF10 feed to the sMS-200Ultra and tX-USBultra turned off. The logic here is that previously I could not really detect much difference if I used the REF10 clock feed to the sMS-200Ultra and tX-USBultra or not. To the Mutec MC3+USB it made a difference, to the SOtM kit, I was never sure. To be honest, whenever I listened to the sMS-200Ultra I did tend to be overly preoccupied with the reproduction of treble and presence range, so this may have masked my ability to discern any subtle benefits of invoking the REF10, but anyway, by leaving the SOtM kit running from it's own internal clock this means that for sure anything that sounds different today is due to the Neo upgrade, not any benefit from the shorter clock cables, they are quite simply not being used. In addition, I had the SOtM re-installed in the system last weekend, I just did not have any time for a proper listen. So everything has had a week to settle down, fully powered up.
One point to make clear here is that I never really got on with the old sMS-200Ultra. I could see (hear) it was good, but there was something that irritated me enormously about the treble and presence range, which seemed too prominent and hence made things sound a little harsh to me. This is obviously system dependent, and to a degree, my ears dependent, but this is the starting point in my case.So to the listening. It was immediately apparent that whatever it was that was annoying me with the treble and presence range with the old sMS-200Ultra was now gone. I have posted before about how much happier I was listening when back with the microRendu, the system was just so more coherent and tonally balanced. Maybe not as good as the sMS-200Ultra in many areas, but the microRendu I could sit and listen to for hours, the sMS-200Ultra quickly became irritating, so it didn't really matter if it was good in other areas. So after months of fretting over the HF, today with the Neo I can simply sit and listen to everything. With the old sMS-200Ultra I could mitigate things a little by running the treble at -3dB, I tried this today with the Neo and it sounded great, but sometimes I felt I was maybe missing a touch of clarity and sparkle, so I was happy to stick to good old 0dB. I know aural memory is notoriously unreliable, but to go from months of being slightly irritatating to being happy with the sound has to mean something.
So this almost feels like a full reset to me now. Today I was listening and able to enjoy everything, the Neo seems far more coherent to me. As an example, you might have a track with a snare drum, with the old sMS-200Ultra I might start to get preoccupied with the sound of the snare itself, sounding too prominent and hence harsh and somehow disconnected to the rest of the music, with the Neo the sound of the drum, snare and the rhythm of the music come together, but the snare can still be heard clearly, it sounds like a snare, not like something irritating. The Neo does sound a little more full-bodied, but in a good way, it still has the details and dynamics, it is just the way they are delivered sounds more natural and real.
It is early days with the Neo. Very often it takes a few weeks to fully appreciate new kit, or to discover subtle reasons it may be better or worse than you first thought. First impressions though, it sounds like a more dynamic higher resolution version of the microRendu. I really like that old microRendu, so that is very good first impressions.
Some other thoughts that I have. When I tried the sPS-500 to power the microRendu I found that this was a step backward from the Uptone LPS-1. Today, I was quite happy listening to the SOtM kit with the sPS-500, but it does make me wonder if something like the Paul Hynes SR4 would be a better option, I am as sure as I can be that it would. The other thought that I have is regarding the Neo update itself. Apparently, the change is to the power board only, and here just a change in the capacitor. How is it possible that this takes the sMS-200Ultra from something that I personally found irritating to something great. Utterly baffling, but yet more evidence as to just how subtle audio reproduction can be.
I have had the offer to borrow a dCS Network Bridge. Back when the sMS-200 was annoying me, this seemed like a good plan, but now I am not sure if I can be bothered, I reckon I should get a pair of SR4's and be done. But maybe trying the Network Bridge would be prudent before spending more cash on PSU's? I don't know. The short-term plan is to do nothing, play lots of music and see how I feel in a few weeks. Oh, and I might try invoking the REF10 on the SOtM kit again, when I am in the mood.
-
Comparison
Forgive me Computeraudiophiles, for I have sinned42 minutes ago, bachish said:A 4416 recording, properly downsampled and dithered, should be indistinguishable from the high res version, especially on a high end system.
Sound Keeper's web site has tracks of different resolutions for free downloads. Listen to them. With my system the 16/44 tracks sounded very similar to hires tracks.
-
HQP settings
hqplayer resampling filter setup guide for ordinary personnow I use the trial versions of hqplayer, there is another 20 days for me to try this trial versions.
I notice there are different oversampling filter and noise-shaping selection. so it is a little bit diffcult for the normal person such as me to find the best combination.
I wondering if there are some easy understanding instructions for different combination of hqplayer resampling filter and noise-shaping selection even just in design pursose.
i am glad to find the software developer Misk in this forum, so I hope if it is possible for Miska to give a easy understaning introduction for the combination of these different filters. the pdf manual of the guide has too many technical words for me to get a good understand.
I know everybody has his own music device and own favorite. but can you give a general introduction of thes combination output design purpose.
or any suggestion for my system
my computer is windows7 x64 operation system, 8G memory, I7 processor.
My soundcard is LYNX L22.
minimax tube pre-amplifier, plinus sa-100 amplifier, sonus faber amati homage speaker.
I like the sound which hqplayer provide and i hope i can find the best combination, I try something and find just by my ears it is not so easy.
thanks and rgds
hdwater
-
HQPlayer virtual soundcard
HQ Player31 minutes ago, juanitox said:HQplayer4 see the Virtualsound card on his input setting but unfortunalty it doesn"t stream it on his output
To receive input from a virtual (or physical) audio device, I discovered there is a 2nd step required:
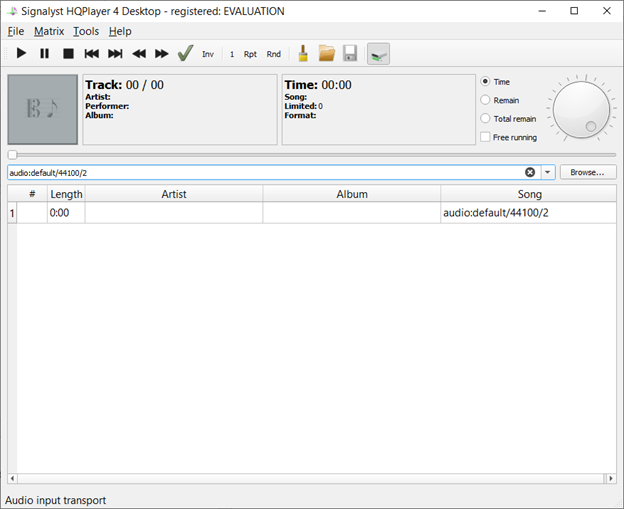
Step 1: Select the desired input device in Settings.
Step 2: In the main screen of of HQP4Desktop, there is a text field labeled "Content source URI" immediately below the elapsed time progress bar and above the playlist. Click the popup arrow at the right end of that text field and select the entry corresponding to the sample rate of the source, e.g., "audio:default/44100/2". (You can type it in, but the popup obviously is easier.)
(Step 2 implies that, like HQP Embedded, HQP4Desktop does not automatically adapt to different source sample rates. You must change this manually.)
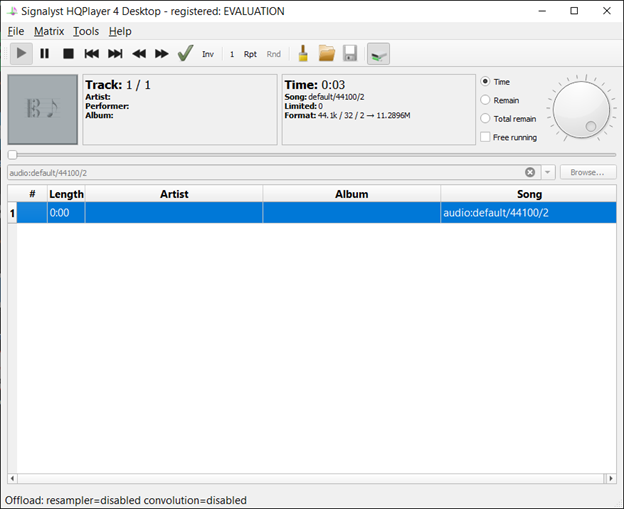
Step 3: Click the Play button.
Step 2 alternatively can be performed using the popup menu in the upper right corner of the Play view of the Client program. Of course, Step 3 also can be performed in the Client.
To stop playback, I find you must use the Stop button, not Pause.
(I only tried this on a Mac.)
-
HQP loop
HQ PlayerRegarding WASAPI inputs, including ones from loopback devices, I just realized couple of things that affect the functionality and produce exactly types of errors logs here have shown... This however doesn't concern ASIO inputs as Windows doesn't know about those.
- Similar to macOS, one needs allow use of audio inputs. Open Settings, and then go to Privacy -> Microphone and check that the switch "Allow apps to access microphone" switch is turned on. This concerns also all other audio inputs, not just microphones.
- HQPlayer window must have focus (topmost, and screensaver not active), otherwise OS doesn't allow access to audio inputs anyway. Meaning that playback cannot be started from WASAPI input using Client on the same machine.
The reason was more clear after I implemented shared mode input support, because then it says "Access denied" instead of obscure error that format cannot be set with Exclusive mode. I can totally understand why these privacy limitations exist in the OS, but one does need to know about these or otherwise it will be really confusing...
Behavior is different from macOS, where OS does allow starting playback and everything, but just provides silence as input unless HQPlayer is explicitly allowed to access "Microphone".
-
Tunes to try
Lies about vinyl vs digital42 minutes ago, The_K-Man said:Which kind of compression?
I am sorry about being unclear/ambiguous -- I meant agc style compression -- almost everything on YouTube -- the normal commercial stuff -- seems to have been too 'lovingly' compressed (even though it'd be nice if there was less bit-saving compression also.)
My own default usage comes from well over 20yrs ago, when someone said 'compression', then they meant some kind of audio AGC. I keep forgetting about digital compression (even though I am a software/DSP/EE type engineer.) Stuck in the old days I guess.
Semi on/off topic or somewhere in-between -- FINALLY got the DA decoder to do what I want it to do (it is the opposte of a compressor, but a 4 band expander with very eccentric characteristics.) I didn't truncate the file yet, and will take it down soon -- but this copy of 'Reason to Believe' should sound similar to the vinyl version -- NOT THE TYPICAL CD. It might be a bit more clear, and have more dynamic range, and have clearer separation in the chorus and the specific copy has had ZERO manipulation after decoding it. I think that the archivists are going to like these kinds of results!!! This is mega knock-your-socks-off (I still haven't put my socks back on...)
https://www.dropbox.com/sh/ab9nhtqjforacd8/AABvt7IYgoob7VXxpN0ekK6ra?dl=0
-
More tunes
Lies about vinyl vs digital6 minutes ago, SJK said:I think that many of you, dare I say, have missed the point.
It’s not about vinyl vs digital!
It’s about how to digitize vinyl so that it sounds the same.
And yes, it is possible. Not easily done, but possible.
Actually, I have some DolbyA near masters, and can do the DolbyA decode and compare with the vinyl -- the vinyl loses by far. Please listen to my examples on the following dropbox site. below is a legend and explanation describing the contents:
Location of the examples: https://www.dropbox.com/sh/ab9nhtqjforacd8/AABvt7IYgoob7VXxpN0ekK6ra?dl=0
I have problems tolerating ABBA also, but their sound is VERY DIFFICULT for a DolbyA decoder to process.
There is something about the intensity/fast slew of the levels of the highs, and the liklihood of intermodulation.-
"Me and Bobby and Bobby's Brother"
-16-45S -- Best quality DHNRDS DA decode
-16-EQ-45S -- same as -16-45S, but with moderate highpass at 80Hz
-CDmp3-45S -- Best quality sound CD (sorry about mp3 source)
-vinyl-45S -- vinyl source
Note that even though the vinyl version is a little more mellow, it has a 'burn' in the sound. It has kind of
a middle/high frequency emphasis -- that 'emphasis' is actually lower sideband IMD. It is an EVIL thing.
The DHNRDS has much less burn in the sound (in fact, the leftover burn might have come from the source
material.
-
Ring Ring examples:
-16-45S -- Best quality DHNRDS DA decode
-16-EQ-45S -- Same as -16-45S, but EQed to be similar to vinyl (moderate highpass at 80Hz.)
-CD-45S -- Best quality/minimally compressed CD in my archives
-vinyl-45S -- Vinyl rip
+-TCSR-45S -- LOUD, but similar peak level.
Notice that the CD is horribly EQed & relatively muffled.
The vinyl is dead/muffled sounding. vinyl sounds compressed.
TCSR IS MUCH LOUDER -- BEWARE. The TCSR version is 'radio station' style compresed,
but doesn't appear to be decoded either -- like the radio compression is added to the
DolbyA encoding.
https://www.dropbox.com/sh/ab9nhtqjforacd8/AABvt7IYgoob7VXxpN0ekK6ra?dl=0
-
tunes
Lies about vinyl vs digital1 hour ago, Ralf11 said:John, what release years and types of music will your DolbyA fix correct?
i.e. when did they use DolbyA encoding w/o decoding?
I realize that the DA decoder (cannot really call it a 'DolbyA' decoder) might be a nebulous thing to people less than 50yrs old. The basic problem for us customers is a lot of material created between late 1960's through early 1990s was recorded on analog tape -- but not handled correctly for digital.
Even if not recorded on analog tape, they might have used the DolbyA noise reduction system. The DolbyA is meant to mitigate tape hiss (and other middle/lower frequency kinds of noise from old analog tape.
It is hit or miss what needs decoding and what doesn't need decoding. Sometimes it is hard to tell if something needs decoding because they might do some EQ to half-a**ed correct the sound rather than decoding.
I am including links to two IDEAL examples -- and the material is pure and hasn't been EQed. Most of the time, leaked DolbyA material has been EQed, and it is difficult to figure out how to fix it before trying to decode. It is insidiously difficult for even me to fully 100% accurate determin if something is/is not DolbyA encoded. Just sometimes, they forget even to EQ (which hides some of the artifacts), the it becomes 150% obvious that it is encoded. LISTEN TO THE SOUND OF THE UNDECODED MATERIAL -- remember carefully, and if you find that harsh or compressed kind of sound -- then a DolbyA decoder JUST MIGHT fix the problem. The 'bad' sound is somewhat remedied by a bit of EQ -- but this ABBA example is as clear/obvious as I have ever heard.
I wasn't careful about bitrates or bitdepths or anything like that -- they end up being insignificant when comparing the original as on the ABBA Gold CD (203-short.flac), and the decoded version (which is similar to decoding DolbyB material -- except DolbyA is the first generation of Dolby and used by pros) is the result of using the new DHNRDS decoder. These are all short enough to keep out of trouble -- DARN IT!!! :-).
Undecoded DolbyA is the file 203-short.flac
https://www.dropbox.com/s/vjun8yc2tnm6v9c/203-short.flac?dl=0
Decoded DolbyA is the file 203-decoded-short.flac
https://www.dropbox.com/s/cj5r5kd2a9r3mwi/203-decoded-short.flac?dl=0
-
Downloads
Lies about vinyl vs digital23 minutes ago, KingRex said:You all have completely bummed me out. I am even being told the PS to the devices burning a CD to my HD affect the sound quality. This all leads me to ask, how do I find good downloads that are actually handled correct in the mastering of the original to a digital format. How do I set up my equipment to accept a transfer of the media over the internet to my house and storage drives at my place.
The biggest issue is where are the good masters? It sound like even MFSL has high res that may not be all the good. Just poor masters that have been up-sampled. Is there a thread on what are the best digital master files to purchase?
The ideas in the first paragraph are held by very few people and can be safely ignored.
When it comes to downloads from the big labels, the releases sold by the various outlets (HDTracks, ProStudio Masters, etc.) are all the same and originate from the labels themselves.
If you want good sounding downloads from other sources, I suggest the following sources:
http://www.chesky.com/content/binaural-series
I don't agree with the comments about MFSL. Most MFSL releases that I've heard are pretty good. Unfortunately, high resolution downloads aren't available. The best you can do is rip their SACD releases.
-
Loop back
HQ Player3 hours ago, sdmarquart said:But what about sound from the internet and other programs?
For Windows only!
There are two methods to loopback the sound:
Method 1
Part A:
If your sound card supports it, in the Windows Sound panel, under the Recording tab, set the “Stereo mix” or “loopback” device as the default (there isn’t one in the pic below):

Click on Properties and under the Advanced tab, select the bit rate and sample rate. You will use the same values in HQplayer:
Part B:
In HQPlayer, in the settings, select the “Stereo mix” (or “loopback”) as the input device (backend=WASAPI).
Then, select the bit rate/sample rate:
Then, with the focus on that box (with the bit rate/sample rate) hit Enter. It should look like this:
Now, click on the line under Length/Artist/Album/Song:
You should be all set.
Method 2
If 1 above is not an option, you will need to install a virtual cable. Google Virtual Audio Cable by Eugene Muzychenko or VB-Audio Cable. Download and install the virtual cable.
Part A:
In the Windows Sound panel, under the Recording tab, set the virtual cable as the default. Click on Properties and under the Advanced tab, select the bit rate and sample rate. You will use the same values in HQplayer.
Part B:
Same as Part B above, except select the virtual cable instead of “stereo mix” (or “loopback”).
-
Upstream clocking
Sonore opticalRenduThe understanding of "isolation" in digital audio has been my passion for at least 10 years. There is a LOT of misunderstanding on the subject floating around in audio circles. Here is a quick summary of my current understanding and how the current products fit in with this.
There seems to be TWO independent mechanisms involved: leakage current and clock phase noise. Various amounts of these two exist in any system. Different "isolation" technologies out there address one or the other, but very rarely both at the same time. Some technologies that attenuate one actually increase the other. Thus the massively confusing information out there.
Leakage current is a property of power supplies. It is the leakage of AC mains frequency (50/60 Hz) into the DC output. It is usually common mode (ie exists on BOTH the + and - wires at the same time, this makes it a bit difficult to see. There seems to be two different types, one that comes from linear supplies and is fairly easy to block, and an additional type that comes from SMPS and is MUCH harder to block. An SMPS contains BOTH types. They are BOTH line frequency.
Unfortunately in our modern times where essentially all computer equipment is powered by SMPS we have to deal with this situation of both leakage types coming down cables from our computer equipment. There are many devices on the market (I have designed some of them) for both USB and Ethernet, most can deal with the type from linear supplies but only a few can deal with the type from SMPS.
Optical connections (when the power supplies are completely isolated from each other) CAN completely block all forms of leakage, it is extremely effective. Optical takes care of leakage, but does not deal with the second mechanism.
Clock phase noise
Phase noise is a frequency measurement of "jitter", yes that term that is so completely mis-understood in audio circles that I'm not going to use it. Phase noise is a way to look at the frequency spectrum of jitter, the reason to use it is that there seems to be fairly decent correlation to sound quality. Note this has nothing to do with "pico seconds" or "femto seconds". Forget those terms, they do not directly have meaning in audio, what matters is the phase noise. Ynfortunately phase noise is shown on a graph, not a single number, so it is much harder to directly compare units. This subject is HUGE and I'm not going to go into any more detail here.
Different oscillators (the infamous "clocks" that get talked about) can have radically different phase noise. The level of phase noise that is very good for digital audio is very difficult to achieve and costs money. The corollary is that the cheap clocks used in most computer equipment (including network equipment) produce phase noise that is very bad for digital audio.
The important thing to understand is that ALL digital signals carry the "fingerprint" of the clock used to produce them. When a signal coming from a box with cheap clocks comes into a box (via Ethernet or USB etc) with a much better clock, the higher level of phase noise carried on the data signal can contaminate the phase noise of the "good" clock in the second box. Exactly how this happens is complicated, I've written about this in detail if you want to look it up and see what is going on.
The contamination is not complete, every time the signal gets "reclocked" by a much better clock the resulting signal carries an attenuated version of the first clock layered on top of the fingerprint of the second clock. The word "reclocked" just means the signal is regenerated by a circuit fed a different clock. It may be a better or a worse clock, reclocking doesn't always make things better!
As an example if you start with an Ethernet signal coming out of a cheap switch, the clock fingerprint is going to be pretty bad. If this goes into a circuit with a VERY good clock, the signal coming out contains a reduced fingerprint from the first clock layered on top of the good clock. If you feed THIS signal into another circuit with a very good clock, the fingerprint from the original clock gets reduced even further. But if you feed this signal into a box with a bad clock, you are back to a signal with a bad fingerprint.
The summary is that stringing together devices with GOOD clocking can dramatically attenuate the results of an upstream bad clock.
The latest devices form Sonore take on BOTH of these mechanisms that effect sound: optical for blocking leakage and multiple reclocking with very good clocks. The optical part should be obvious. A side benefit of the optical circuit is that is completely regenerates the signal with a VERY low phase noise clock, this is a one step reclocking. It attenuates effects from upstream circuits but does not completely get rid of them. This is where the opticalModule comes into play, if you put an opticalModule in the path to the opticalRendu you are adding another reclocking with VERY good clocking. The result is a very large attenuation of upstream effects. It's not completely zero, but it is close.
The fact that the opticalRendu is a one stage reclocking (which leaves some effects from upstage circuits) is why changing switches etc can still make a difference. Adding an OpticalModule between the switch and opticalRendu reduces that down to vanishingly small differences.
So an optical module by itself adds both leakage elimination and significant clock effects attenuation. TWO optical modules in series give you the two level reclocking .
An opticalRendu still has some significant advantages over say an ultraRendu fed by a single opticalModule, the circuitry inside the opticalRendu has been improved significantly over the ultraRendu. (it uses new parts that did not exist when the ultraRendu was designed). In addition the opticalRendu has the reclocking taking place a couple millimeters away from the processor which cuts out the effects of a couple connectors, transformers and cable. The result is the opticalRendu has some significant advantages.
An opticalModule feeding an ultraRendu does significantly improve it, but not as much as an opticalRendu. So you can start with an opticalModule, then when you can afford it add an opticalRendu, also fed by the opticalModule and get a BIG improvement.
I hope this gives a little clarity to the situation.
John S.
-
Audio test
Digital Audio and Amplifier Noise Floor Comparison - Is 16bit/44.1kHz All We Need ???On 6/22/2019 at 2:46 AM, fas42 said:But, 16/44.1 can handle both rough at the edges, and very well recorded - as a means of storage of "all that matters" - the noise floor of 16/44.1 I have never found to be a limit; poor judgement, mistakes in mastering have always been the causes of something that seemed not quite right that in what I've come across.
Things like needing dither ... one has to create an extreme listening situation, to clearly hear the effects of not applying dither to CD tracks - a situation which would never happen in any listening to a music CD.
Have you tried these audibility tests?
-
Distort
Query about the "jitterstream"7 hours ago, CG said:Truer words have seldom been written!
In communications systems, it's generally more valuable to measure the spectrum of the phase noise, as John describes. Not easy or cheap, by a long shot.
For audio reproduction, you'd think that there'd be a way to measure the phase noise sidebands of a synthesized tone at the output of a DAC (DAC as in a complete digital audio converter, not just a DAC chip). It wouldn't be easy or cheap, but possible. That might give a clue as to the effect of phase noise on the audio output. Of course, it would also be combined with other effects, but those affect the sound, too.
One gotcha: Almost all measurements in the audio world are made using various averaging or smoothing techniques. This is done with the idea that noise is random, while the desired tones you are trying to measure are not. So, if you take a bunch of repeat measurements, the noise will average to a much lower level because the noise is assumed to be completely random, while the desired tones will remain constant. This lets you detect lower level signals within the noise.
That is true, but probably misses a key point.
Many "phase noise events" are transitory by nature. So, you'd only see them once in a while. Once in a while, as in every 1000 sample sweeps. There you might witness an awful spectrum due to a bunch of factors. The next sample sweep could be fine. In a communications system, that symbol is lost and is a loss of actual bits. But, one lost symbol out of a thousand gives the misleading impression that everything is ok when you apply averaging. Not so if you count bit errors. (If you don't believe me, try measuring MER versus BER some time...)
But, is one bad audio sample out of a thousand actually audible? I'd guess so, but I don't know of any research that concludes anything either way. (If anybody knows of any, please post a link!)
The point is, you probably really need to use a different approach to measuring the effects of phase noise in an audio system as I described. (You could argue this is necessary for plain old distortion, too, but that's another topic for another forum.) Perhaps using a peak or max hold function would be more valuable. You'd just retain the highest value in every FFT bin for several thousands sweeps and display that. This isn't that difficult to do in software. (Here's one simple example - http://www.w7ay.net/site/Applications/Amici/index.html)
In addition, phase noise on a clock effectively modulates each and every converted tone in the audio spectrum with that noise content. If the frequency content of the phase noise is low enough, that's pretty much the same thing as rocking your loudspeakers back and forth at whatever rate the phase noise modulation is. Maybe that's bad; maybe that's even good! Dunno.
I apologize to the OP for going off into the esoteric here, but the topic probably is worth investigating.
Here's a way to try to go about determining audibility of various types of jitter: https://distortaudio.org/
DISTORT is still in development (I call it a continuous beta
") ), but already has a few useful features.
), but already has a few useful features.
One, you can apply any number, frequency and level of sine-modulated clock jitter to an existing recording and then listen. You can add random jitter. Or correlated jitter. Or 1/f noise-modulated (close-in) jitter. Or any combination of the above. The recording can be as simple as a sine wave, or as complex as a symphony -- your choice. Apply jitter, save it, then play it back on your 'perfect' system and listen to see if you can hear the effect. Or even listen directly on your computer with DISTORT playing the audio file. You can then switch nearly instantaneously between the original and the distorted tracks using the Bypass button.
Here's some correlated, 1/f and sine-modulated jitter applied to a simple 1kHz sine wave:
Oh, and best of all -- no FFTs are used to generate jitter or harmonic distortion, everything is done in the time domain.
-
sotm mods
A novel way to massively improve the SQ of computer audio streamingHello Jai,
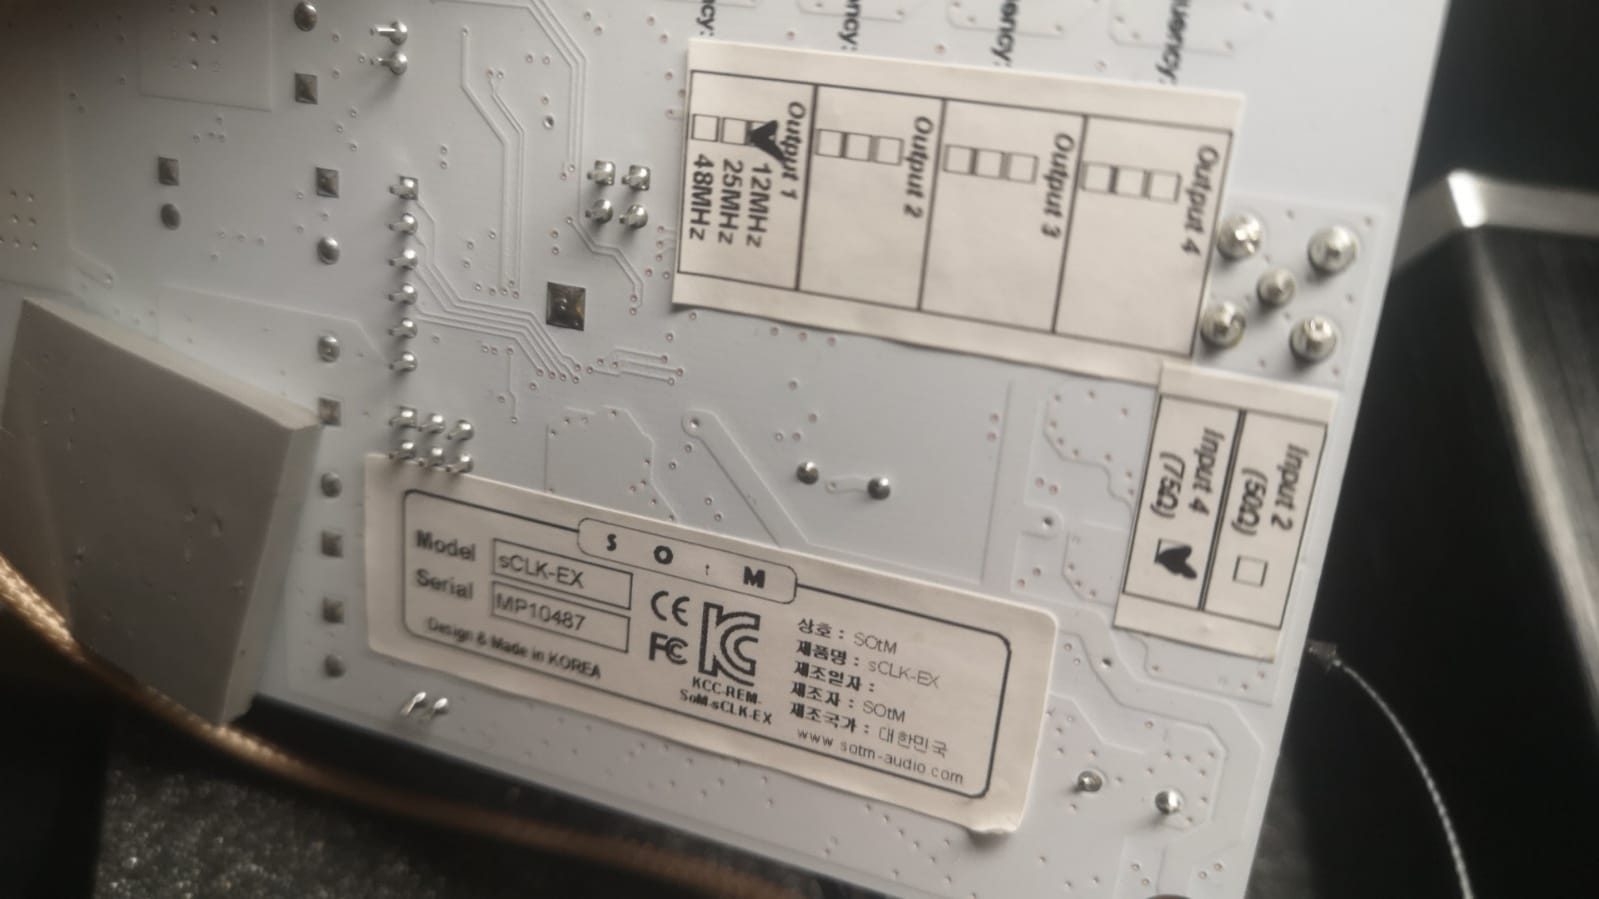
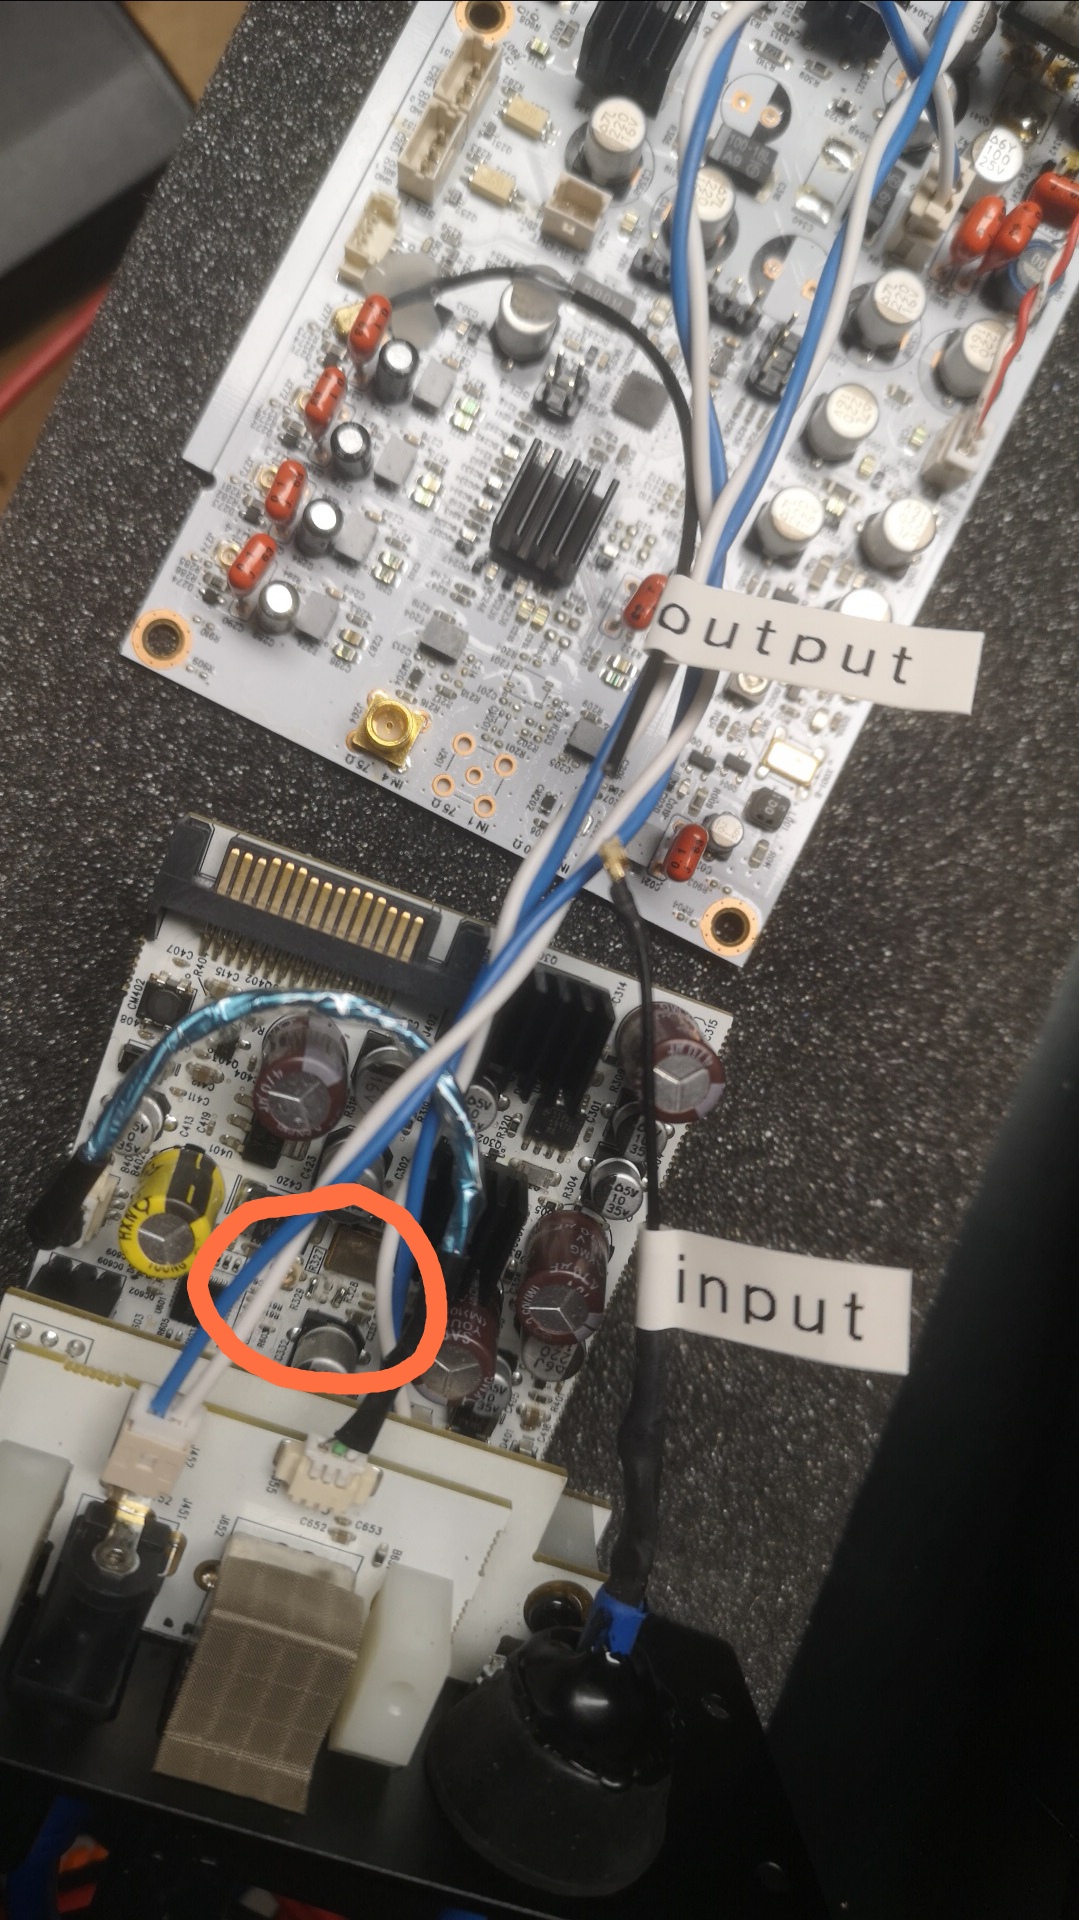
i am sorry i took not enought Pictures while i did the mod. I think you will get the information on the attached Picture. There is a 50 Ohm Connection between the sCLK Module. Instead of using the SotM Way, and feed the System with a 10 MHz to be upscaled to 12 MHz, that ist used by the USB-Reclocking Part (i mark it with a red circle, were you need to feed it with a 12 MHz-reference-Clock. You Need a 50 Ohm Clockoutput from a e.g. Neutron Star. and a 3.3V PK-PK Signal. You Need a U.FL connector x 1 Cable to connect it.
Regards
Sunny
-
HQPlayer filters
hqplayer resampling filter setup guide for ordinary personI've been trying to avoid too much technical jargon in the manual, but balancing it is quite difficult. I'll try to explain things a bit further, but please ask if you would like to have some areas covered further.
First a bit explanation on time and frequency domain, please excuse me for some technical jargon. Frequency is signal change as function of time. Thus a signal has presentation in both frequency and time domains. "Linear phase filter" is a filter where all frequencies pass with same time delay. "Minimum phase filter" is a filter where all frequencies pass through as fast as possible, higher frequencies faster than lower ones. Longer/steeper filters change faster from passing frequencies to not passing frequencies as function of frequency. Shorter/gentler filters transition more slowly or "gently" from pass to stop as function of frequency. More accurately the filter wants to detect frequencies and transition pass/stop faster, longer time the filter has to "look" at the signal. This has side effect called "ringing" or rather "time blur". On the other hand, extremely short filter like a one that looks only at single moment cannot filter anything at all, because it sees only single point of time at once without any history or future (so it cannot detect any frequencies as those are a change over time). Linear phase filter takes equal amount of history and future into account during calculation. The problem in this is that it is kind of unnatural for something that is going to happen in future to affect already the present. Minimum phase filter on the other hand considers only from present to past, so it doesn't reflect things that are coming in future. This "ringing" is already in most RedBook recordings, since in most cases the ADC has gone through down-conversion and possibly another round at mastering from 24/96 or similar to RedBook. "Apodizing" filter is one that replaces or modifies this original ringing with it's own - that can be less than the original. All the filters explained below are more or less "apodizing" unless otherwise noted.
Why is "filtering" needed? Because otherwise upsampling/oversampling produces alias (distortion) components in frequencies above the original one. In down-conversion case it is even worse, because those components are produces below the original ones. D-A conversion also produces these components above half of the sampling rate frequency, and those are then removed by the analog reconstruction filters. Higher the sampling rate seen by the D-A conversion stage, simpler the following analog filter can be. Digital filters can easily outperform analog ones. Removing those spurious frequencies by filtering is called signal "reconstruction".
So if I go from left to right on the main window...
First is the filter selection, most of these can perform either up or down conversion, depending on what is needed.
- So "IIR" the first one is how a steep analog filter would sound like, I don't recommend using it for anything else than upsampling and only at 2x or 3x ratios, although it can do higher ratios or down-conversion too. I think this is mostly useful to hear how "extreme analog" would sound like. Some DAC chips have slightly similar output stages.
- Then there are three types of traditional "FIR", these are similar in construction to those ones used inside most DACs, the "asym" one being somewhere between linear and minimum phases, only taking "near future" into account. So a traditional design made as good as possible.
- "FFT" is a special kind in that it performs it's work in frequency domain and is also fairly steep. This is technically closer to how audio codecs work than how upsampling is traditionally done. I don't know if any hardware oversampling implementation would use similar technique.
- "poly-sinc-*" these are the ones I use most and recommend the most, these can perform conversion from most input rates to outputs rates in a single pass and with a very low CPU load. Single pass approach maximizes the filter precision. (those who will eventually ask, these are synchronous converters)
- "sinc" is a true asynchronous converter and can perform conversion practically from any rate to any other rate. Although it is quite high quality, it has fairly high CPU load too and not recommended unless the "poly-sinc-*" ones cannot do the needed conversion.
- "polynomial*" is not a filter as such, but just polynomial interpolation approach to upsampling. These look only at small number of samples to calculate a new one and thus don't "ring", but on the other hand the filtering performance is poor too. These kind of filters typically also cause premature treble roll-off (roughly 3 dB or so at 20 kHz for RedBook material, starting from ~10 kHz). These are the controversial upsampling "filters" some people like a lot while others don't like at all. (non-apodizing)
- "minringFIR" this is a single-pass filter that is very similar to the polynomial interpolators above in that it is really short and looks only at very brief period of time, while still performing better at filtering and not having such treble roll-off issues. Not recommended for other than 2x/4x/8x/etc ratios. (non-apodizing)
Then to the next item, dither and noise-shaping. This is needed whenever any processing is performed. Reason is that calculations can lead to results that have more precision than can be expressed in the resolution supported by the DAC. Just truncating or rounding the result to fit the DACs precision causes distortion that is directly related to the signal. Dither hides this rounding error into very low-level non-audible constant noise (a bit like thermal noise) - then it's no more related to the signal. Noise-shaping takes this further by moving this noise to less- or non-audible frequencies. Especially multi-bit converters but to some extent others too also benefit from noise-shaped upsampling in improved linearity.
I don't recommend any noise-shaper for 44.1/48 kHz output rates, because there is no proper frequency space available where to park the noise.
There are number of noise shapers:
- "NS1" is a first-order shaper, just tilting the noise floor so that it increases towards higher frequencies and it has a bit of extra "against-the-wall" high frequency noise too. Not really recommended for anything, but included for completeness sake.
- "NS4" is fourth order shaper that has a gentle step to move a bit of lower frequency noise to ultrasonic frequencies. The only shaper that I would say is useful at 88.2/96 kHz rates.
- "NS5" is fifth order shaper that has been designed to be used at 352.8/384 kHz output rates or above. This one moves aggressively roughly 40 dB worth of noise from low frequencies to ultrasonic range.
- "NS9" is ninth order shaper variant for use with 176.4/192 kHz, the step from low to higher noise is more clear, but otherwise similar to the "NS5"
- "RPDF" this is just plain white noise, not really recommended, but also included for completeness sake.
- "TPDF" is industry standard flat triangular dither, good for any case, especially for 44.1/48 playback cases. Doesn't generate practically any CPU load either.
- "Gauss1" is Gaussian noise dither, should be more "perfect" than TPDF, but also loads the CPU more. Works for all cases too.
Third selection is set of available output sampling rates, computed based on what the hardware and selected filter are capable of, in combination.
Generally, I recommend choosing between "poly-sinc-*" filters and using highest possible sampling rate. Dither or noise-shaper chosen based on above description, "NS9" for 192 kHz output, "NS5" for 384 kHz output and "TPDF" or "Gauss1" for any lower rates...
To be continued, I'll make two other posts. One for the DSD->PCM conversion and maybe other one for PCM->SDM (DSD) conversion.
Hope this helps...
-
Virtual audio cable
HQ Player17 hours ago, sig8 said:Thank you, but I will need little more explanation than that.
Here you can find an example configuration of Virtual Audio Cable on Windows with HQPlayer:
https://www.superbestaudiofriends.org/index.php?threads/the-hqplayer-thread.11376/#post-358014
-
FFFD settings for HQPlayer
Hqplayer: best NAA with best sound quality3 hours ago, Markus8 said:When exporting convolution filter I have various options in FocusFidelity Designer to select in the „Sample Format“ between Float 32 bit or 64 bit or PCM 32 bit or 64 bit.
Which of the option would be best to use?64-bit floating point is best option, if available.